Essential Guide: How To Tie Line On A Baitcaster Reel
Looking to learn how to tie line on a baitcaster reel? You’ve come to the right place! Whether you’re a beginner angler or someone looking to upgrade their fishing skills, mastering the art of tying line on a baitcaster reel is essential. In this article, we’ll walk you through the step-by-step process, ensuring that you have a solid understanding of each technique involved. By the end, you’ll be equipped with the knowledge and confidence to tie line on a baitcaster reel like a pro. So, let’s dive right in and get started on this exciting journey!

How to Tie Line on a Baitcaster Reel
Section 1: The Importance of Properly Tying Line on a Baitcaster Reel
Tying the line on a baitcaster reel might seem like a simple task, but it’s crucial to do it correctly to ensure optimal performance and prevent any mishaps while fishing. A secure and well-tied line increases casting accuracy, minimizes line twist, and enhances overall fishing experience. In this article, we will guide you through the step-by-step process of tying line on a baitcaster reel, ensuring you have all the necessary knowledge to do it effectively.
Section 2: Choosing the Right Fishing Line
Before diving into the process of tying the line on a baitcaster reel, it’s essential to select the right fishing line that suits your fishing needs. Fishing lines come in various materials, strengths, and diameters. Here are a few popular options:
- Monofilament: This type of line is versatile, affordable, and offers good knot strength.
- Fluorocarbon: Known for its low visibility in water, fluorocarbon lines are ideal for clear and heavily pressured fishing conditions.
- Braided: Braided lines provide superb strength and sensitivity, making them suitable for heavy cover and deep-water fishing.
Consider the type of fishing you plan to engage in, the target species, and the fishing environment to choose the most appropriate line for your baitcaster reel.
Section 3: Preparing the Baitcaster Reel
Before tying the line, it’s important to prepare your baitcaster reel for the task. Follow these steps:
- Loosen the drag knob: Turn the drag knob counterclockwise to release the tension on the reel’s spool.
- Remove any existing line: If you’re replacing the line on your reel, cut off any existing line and dispose of it properly.
- Clean the spool: Use a cloth or paper towel to wipe down the spool, removing any debris or dirt that may interfere with line performance.
- Insert the line spool: Place the line spool on the reel’s spool shaft, ensuring it fits securely.
Once you’ve prepared your baitcaster reel, you’re ready to tie the line.
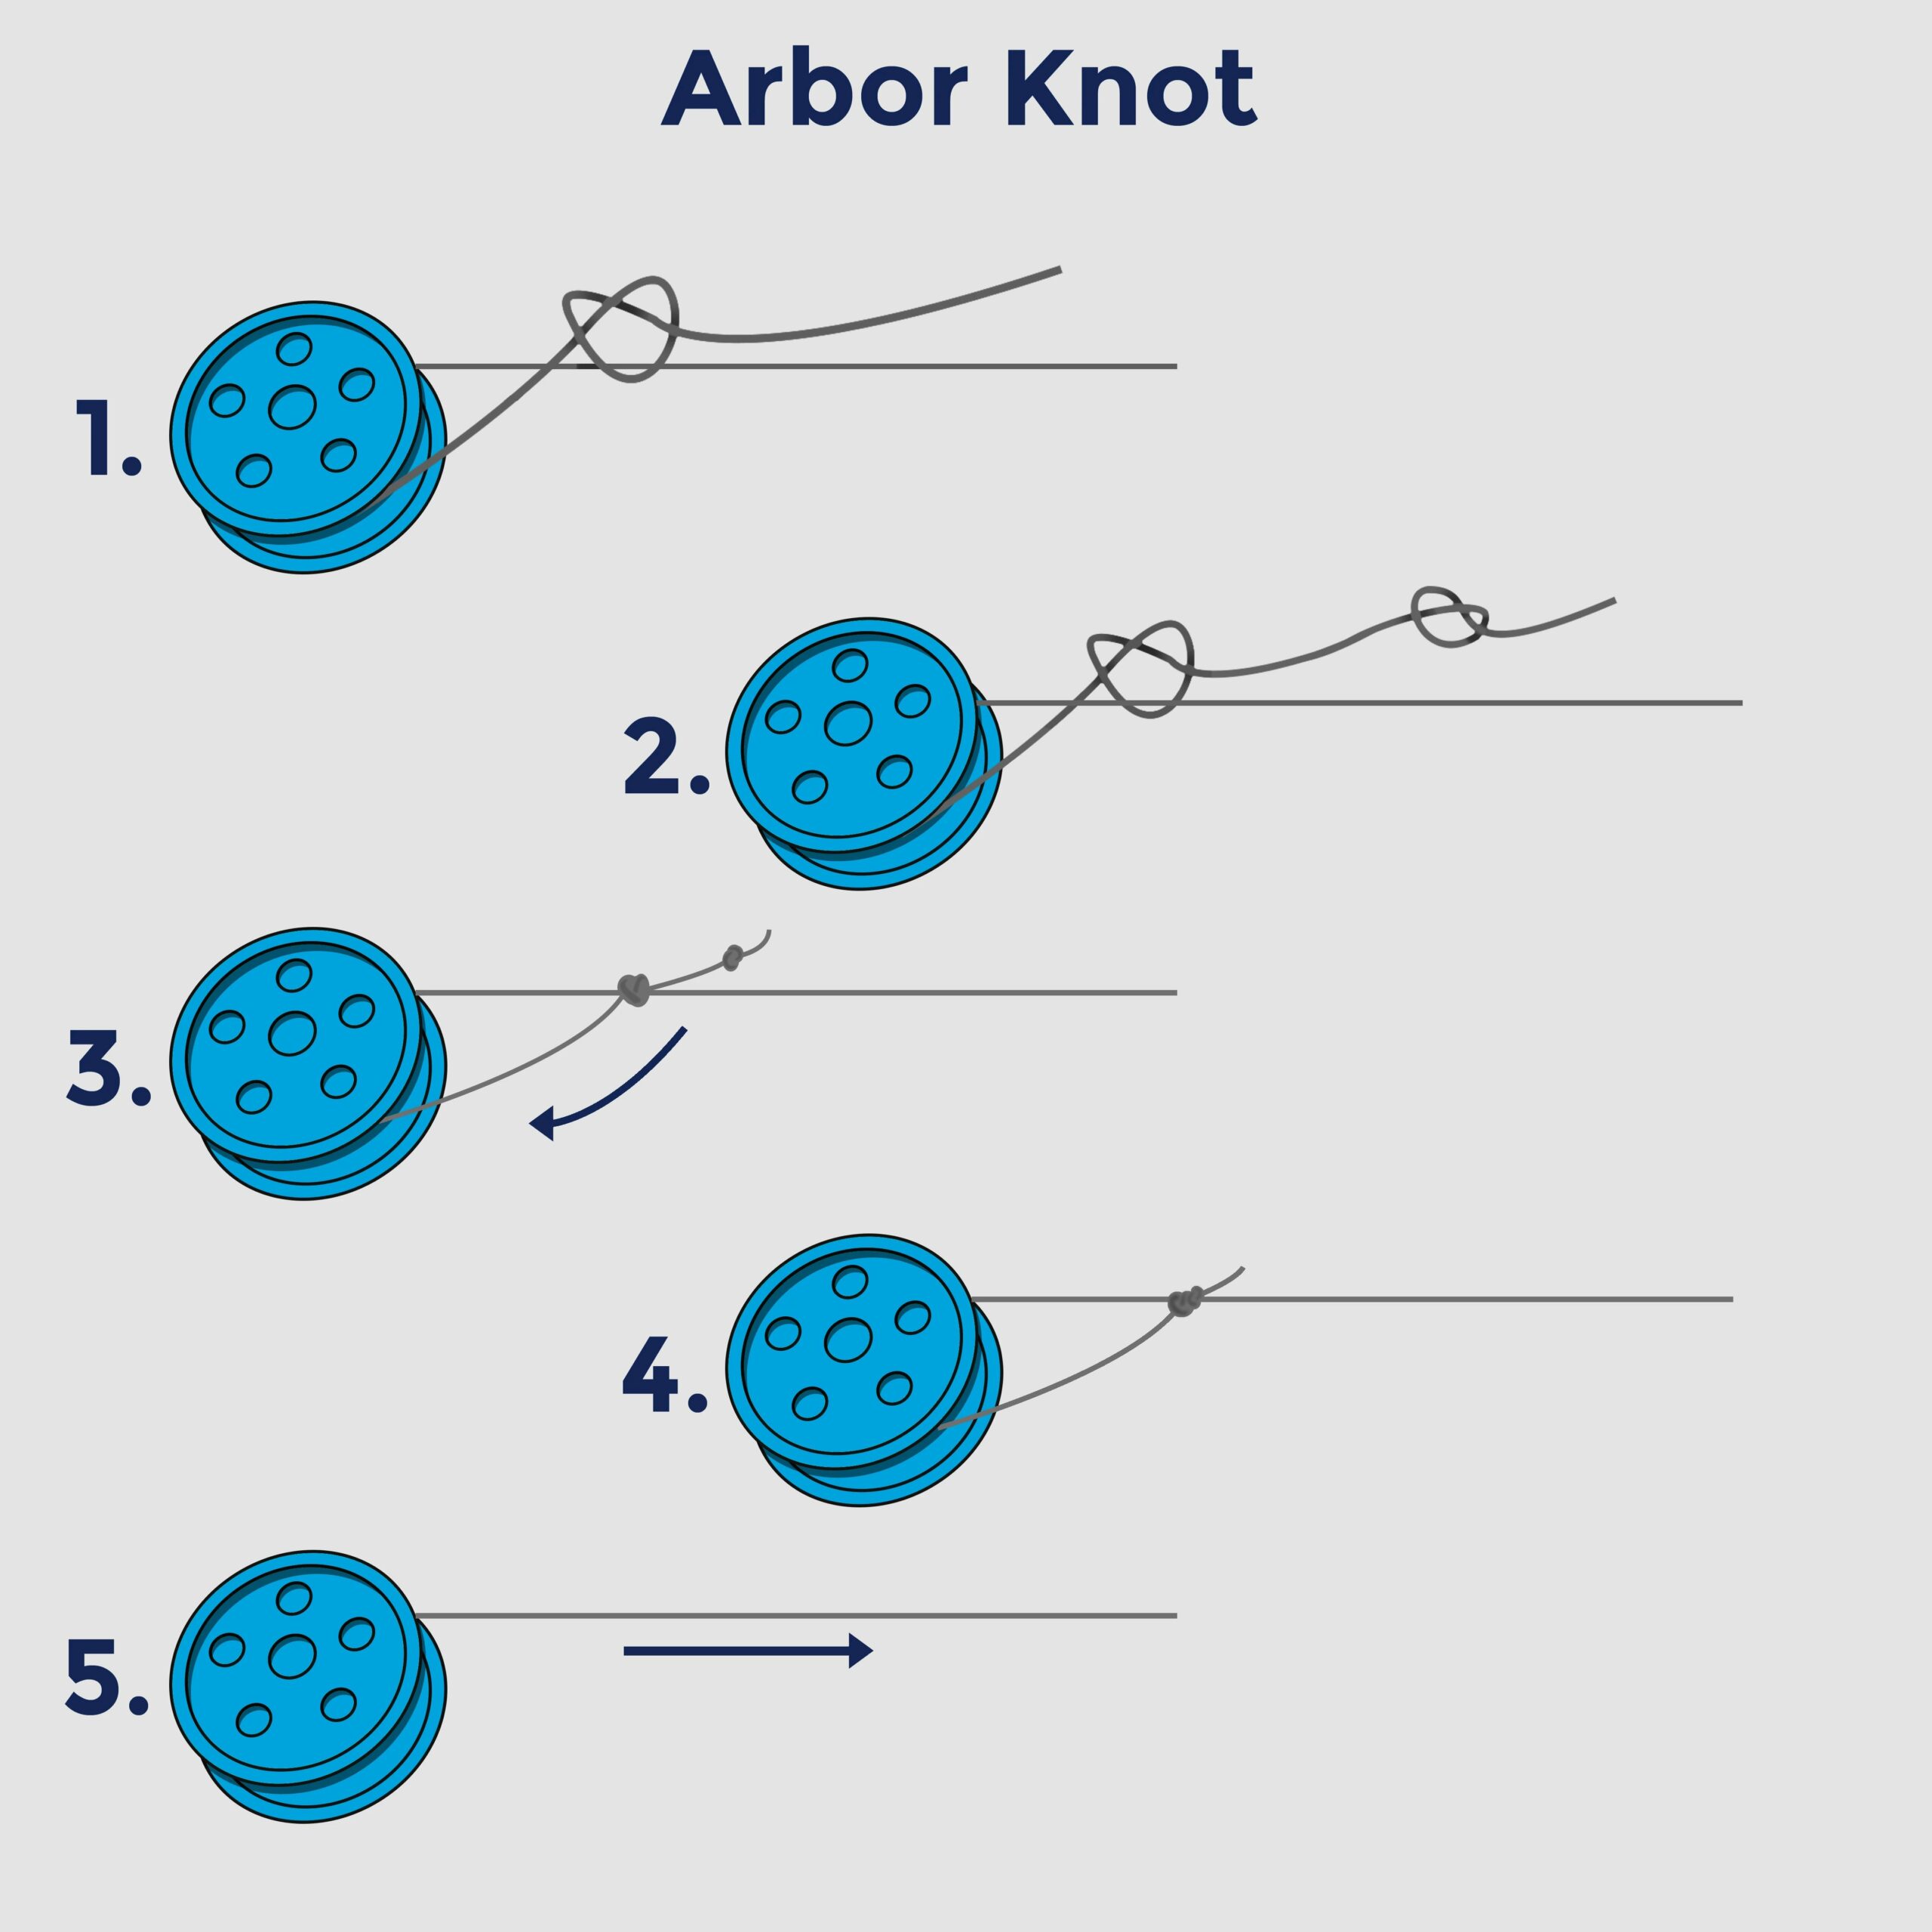
Section 4: Tying the Arbor Knot
The first knot you need to master when tying line on a baitcaster reel is the arbor knot. This knot attaches the fishing line securely to the spool. Follow these steps to tie the arbor knot:
- Pass the line around the arbor of the reel, leaving a few inches of tag end.
- Tie an overhand knot around the mainline, ensuring a loop is formed.
- Bring the tag end through the loop you created.
- Moisten the knot and pull the mainline to tighten the knot securely against the arbor.
The arbor knot ensures that the line is firmly attached to the spool, preventing any slippage during casting and retrieving.
Section 5: Spooling the Line onto the Reel
Now that you’ve tied the arbor knot, it’s time to spool the line onto the reel. Follow these steps to ensure a smooth and even line distribution:
- Hold the line between your thumb and index finger, applying gentle tension.
- Start cranking the reel handle slowly and steadily to spool the line onto the reel.
- Continue spooling the line while maintaining consistent pressure with your fingers to prevent line twists and tangles.
- Fill the reel until it’s about 1/8 inch below the spool rim, leaving room for the line to expand when wet.
Ensure that the line is spooled evenly across the entire surface of the reel to prevent any casting issues or line entanglements.
Section 6: Tying the Suitable Knot for your Fishing Needs
With the line spooled onto the reel, it’s time to tie the appropriate knot for your fishing needs. The choice of knot depends on factors such as the fishing technique, target species, and line type. Here are a few popular knots used for baitcaster reels:
Palomar Knot:
The Palomar knot is a strong and reliable knot suitable for a wide range of fishing situations. It’s particularly effective for braided lines. Follow these steps to tie the Palomar knot:
- Double about 6 inches of the line and pass it through the eye of the hook or lure.
- Tie an overhand knot with the doubled line, forming a loop, and leave the loop large enough to pass the lure or hook through.
- Moisten the knot and pull the loop over the lure or hook. Ensure the knot tightens securely.
- Moisten the knot again and pull both ends of the line to tighten the knot fully.
Improved Clinch Knot:
The Improved Clinch knot is versatile and reliable, making it a popular choice for baitcaster reels. Here’s how to tie the Improved Clinch knot:
- Thread the line through the eye of the hook or lure, forming a loop alongside the hook shaft.
- Take the tag end and make six to eight wraps around the line and through the loop.
- Moisten the knot and pull the tag end to tighten the coils against the eye of the hook.
- Trim any excess tag end, leaving a small tag for added security.
Section 7: Applying Line Conditioners or Monofilament Backing (Optional)
In certain fishing scenarios, it might be beneficial to apply line conditioners or use monofilament backing as an additional measure. Here’s when they can be advantageous:
- Line Conditioners: Line conditioners, such as sprays or gels, can reduce line memory, increase casting distance, and improve overall line performance.
- Monofilament Backing: In situations where you need to fill the spool but the mainline is expensive or requires a large quantity, using monofilament backing can save money. Fill the spool partially with monofilament, and then connect the mainline using appropriate knots.
Decide if using line conditioners or monofilament backing is necessary based on your specific fishing requirements.
Section 8: Testing the Line and Reel
After tying the line onto the baitcaster reel, it’s crucial to test the line’s strength and reel’s performance. Take the following steps to ensure everything is functioning as expected:
- Thumb Test: Place your thumb on the spool and apply pressure while reeling. Ensure that the line doesn’t slip or dig into the spool.
- Sensitivity Test: With the line fully spooled, hold the rod tip and gently tug the line. Ensure that you can feel the slight movements transmitted through the line.
- Casting Test: Head to an open area and test the casting distance and accuracy. Observe any issues like backlash or line twists that may require adjustments.
By conducting these tests, you’ll be able to identify any potential problems and make the necessary adjustments or fixes.
Section 9: Maintaining the Line on Your Baitcaster Reel
Once you’ve successfully tied the line on your baitcaster reel, it’s important to regularly maintain it to ensure optimal performance and durability. Consider the following maintenance tips:
- Inspect the line for any signs of wear or damage, such as nicks, frays, or weak spots. Replace the line if necessary.
- Clean the line and reel after each fishing trip to remove dirt, debris, and saltwater residue. This helps prevent corrosion and extends the life of your fishing line.
- Store the baitcaster reel in a cool and dry place, away from direct sunlight or extreme temperatures. Proper storage minimizes the chances of line degradation.
By incorporating these maintenance practices into your routine, you’ll prolong the life of your line and enjoy consistent performance on your baitcaster reel.
Section 10: Conclusion
Tying line onto a baitcaster reel is a critical skill that every angler should master. By following the step-by-step instructions provided in this article, you’ll be equipped with the knowledge needed to tie the line securely and efficiently. Remember to choose the right fishing line, tie appropriate knots, and regularly maintain your gear to ensure a successful and enjoyable fishing experience. With practice, you’ll become proficient at tying line on a baitcaster reel and be ready to tackle any fishing adventure that comes your way. Happy fishing!
How to spool line onto a baitcaster
Frequently Asked Questions
How do I tie line on a baitcaster reel?
To tie line on a baitcaster reel, follow these steps:
- Thread the fishing line through the first guide of the fishing rod.
- Open the bail or spool release on your baitcaster reel.
- Wrap the line around the spool, making sure to leave a short tag end.
- Tie an overhand knot or an improved clinch knot with the tag end and the main line.
- Tighten the knot securely by pulling both ends of the line.
- Close the bail or spool release, and hold onto the line above the reel.
- Turn the reel handle a few times to ensure the line is properly loaded.
What type of knot is best for tying line on a baitcaster reel?
The improved clinch knot is commonly used for tying line on a baitcaster reel. It is reliable, easy to tie, and provides good strength. However, you can also use other knots like the Palomar knot or the Uni knot, based on your preference.
Should I use a backing when tying line on a baitcaster reel?
Using a backing is not necessary when tying line on a baitcaster reel. However, if you have a large spool or plan to use a thin diameter fishing line, adding a backing can help fill up the spool and prevent slippage of the line.
Can I use any type of fishing line for a baitcaster reel?
Yes, you can use various types of fishing line on a baitcaster reel, such as monofilament, fluorocarbon, or braided line. Each type has its own advantages and considerations, so choose the one that suits your fishing needs and preferences.
How much line should I put on a baitcaster reel?
The amount of line to put on a baitcaster reel depends on your fishing requirements. As a general guideline, fill the spool about 80% to 90% full, leaving some room for the line to expand when wet. You can check the reel’s specifications or consult with a fishing expert for specific recommendations.
Do I need to lubricate the reel before tying line on a baitcaster reel?
It is generally recommended to apply a small amount of reel lubricant to the spool shaft and other moving parts of the reel before tying line. This helps ensure smoother operation and prolongs the lifespan of the reel. However, be careful not to apply excessive lubricant as it may attract dirt and debris.
Final Thoughts
In conclusion, mastering the technique of tying line on a baitcaster reel is crucial for successful fishing. By following the steps outlined in this article, anglers can ensure a secure and reliable connection between their line and reel. Remember to thread the line through the appropriate parts, maintain tension, and tie a strong knot to prevent any slippage or breakage during casting and retrieving. With this knowledge, anglers can confidently tackle any fishing adventure with a properly secured line on their baitcaster reel. So go ahead and apply these techniques to enhance your fishing experience and improve your chances of landing that big catch.