Master The Art Of Wrapping Guides: how to wrap guides on a fishing rod
Looking to learn how to wrap guides on a fishing rod? Look no further! In this article, we’ll walk you through the steps to tie perfect guide wraps that will not only enhance the appearance of your fishing rod but also ensure the durability and functionality of the guides. Whether you’re a beginner or an experienced angler, mastering this skill is essential for maintaining and customizing your fishing gear. So grab your rod and let’s dive right in!

How to Wrap Guides on a Fishing Rod
When it comes to fishing, having a properly wrapped guide on your fishing rod is crucial. The guides help to distribute the stress and tension when you are reeling in a fish, ensuring that your rod remains strong and sturdy. Knowing how to wrap guides on a fishing rod is an essential skill for any angler. In this article, we will guide you through the step-by-step process of wrapping guides on a fishing rod, from choosing the right equipment to finishing the wraps with precision. Let’s dive in!
Section 1: Gather the Necessary Tools and Materials
Before you start wrapping the guides on your fishing rod, it’s essential to gather all the necessary tools and materials:
Tools:
- Fishing rod
- Guide wrapping jig or stand
- Thread tensioner
- Thread bobbin
- Thread scissors
- Small brush or toothbrush
- Isopropyl alcohol
- Cotton swabs
- Masking tape
Materials:
- Thread (nylon, polyester, or silk)
- Guide wrapping epoxy
- Rubber bands or thread ties
Section 2: Prepare the Fishing Rod
Now that you have all the necessary tools and materials, it’s time to prepare your fishing rod for guide wrapping:
Step 1: Clean the Rod:
Using a small brush or toothbrush, gently remove any dirt, debris, or residue from the rod. If there are any sticky substances on the rod, you can dampen a cotton swab with isopropyl alcohol and clean the affected area.
Step 2: Secure the Rod:
Use masking tape to secure the rod to the guide wrapping jig or stand. Make sure the rod is held firmly in place to prevent any movement during the wrapping process.
Section 3: Select the Right Thread
Choosing the right thread is crucial for both functionality and aesthetics. Here are some factors to consider when selecting thread for guide wrapping:
Strength:
The thread should have sufficient strength to withstand the tension applied while reeling in a fish. Nylon or polyester threads are commonly used for their durability.
Color:
Select a thread color that complements the overall design of your fishing rod. You can choose a single color or create intricate patterns by using multiple colors.
Thickness:
Thicker threads provide better coverage, while thinner threads allow for more intricate wraps. Consider the size of your guides and the desired final look when selecting the thread thickness.
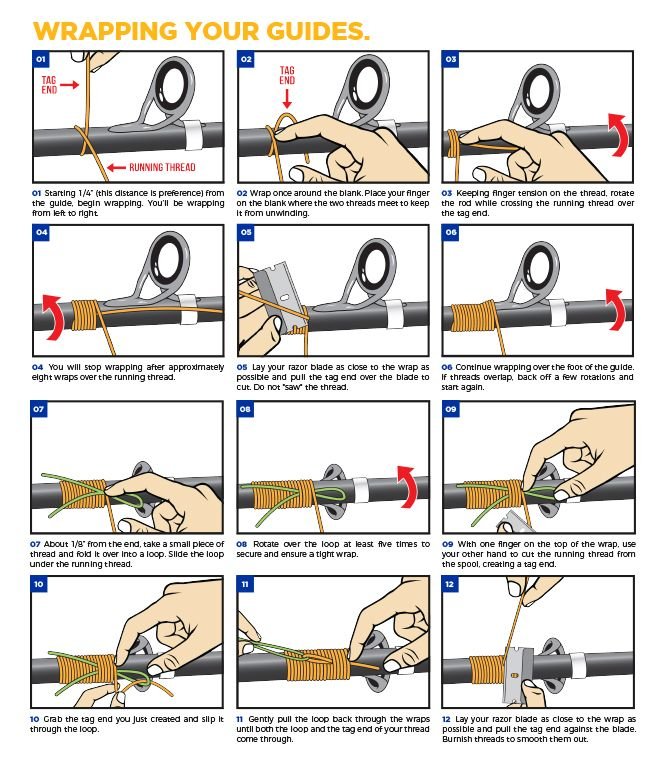
Section 4: Start Wrapping the Guides
Now that your fishing rod is prepared, and you have selected the right thread, it’s time to start wrapping the guides:
Step 1: Attach the Thread:
Attach the thread to the rod by tying a knot near the base of the guide. Ensure that the knot is secure but not too tight.
Step 2: Wrap the Thread:
Hold the thread with one hand and use the other hand to rotate the rod slowly. Wrap the thread tightly around the rod and guide, moving from the base towards the tip. Each wrap should slightly overlap the previous one.
Step 3: Maintain Tension:
Maintain consistent tension while wrapping the thread to ensure a neat and tight wrap. You can use a thread tensioner tool to help maintain proper tension throughout the process.
Section 5: Finishing the Wraps
Once you have wrapped all the guides on your fishing rod, it’s time to finish the wraps with precision:
Step 1: Apply Guide Wrapping Epoxy:
Using a small brush or applicator, carefully apply guide wrapping epoxy over the wraps. Ensure that the epoxy covers the entire wrapped area for added strength and durability.
Step 2: Remove Excess Epoxy:
After applying the epoxy, gently remove any excess using a cotton swab or a clean brush. Pay attention to the guide feet and make sure they are free from epoxy for proper functionality.
Step 3: Let It Cure:
Allow the epoxy to cure according to the manufacturer’s instructions. This usually takes several hours or overnight. Avoid touching or moving the rod during the curing process.
Section 6: Test and Inspect
After the guide wrapping epoxy has fully cured, it’s important to test and inspect the wraps to ensure their quality:
Step 1: Test Guide Alignment:
Gently flex the rod to check if the guides are aligned correctly. They should form a smooth and continuous line along the fishing rod.
Step 2: Inspect for Loose Wraps:
Examine each wrap closely for any signs of looseness or gaps. If you find any loose wraps, you can carefully tighten them using a thread tensioner tool.
Section 7: Add a Decorative Trim
Adding a decorative trim to your guide wraps can enhance the overall appearance of your fishing rod. Here’s how you can do it:
Step 1: Choose a Trim Material:
Select a trim material, such as metallic thread, metallic tape, or decorative wraps, that complements the design of your fishing rod.
Step 2: Apply the Trim:
Attach the trim material to the rod using a small amount of epoxy. Be creative and experiment with different patterns and designs to achieve the desired look.
Section 8: Maintenance Tips
To ensure that your wrapped guides on the fishing rod remain in top condition, follow these maintenance tips:
Keep It Clean:
Regularly clean your fishing rod and wrapped guides using a soft cloth to remove dirt, salt, or other contaminants that may affect their performance.
Avoid Excessive Force:
While fishing, try to avoid excessive force or impact on the guides. Treat your fishing rod with care to prevent any damage to the wraps or guides.
Inspect for Damage:
Periodically inspect your wrapped guides for any signs of wear, loose wraps, or damage. If you notice any issues, address them promptly to prevent further damage.
Section 9: Conclusion
Wrapping guides on a fishing rod may seem like a daunting task, but with the right tools, materials, and techniques, it can be a rewarding experience. By following the step-by-step process outlined in this article, you can ensure that your guides are securely wrapped, providing optimal performance and durability. Remember to take your time, pay attention to detail, and enjoy the process of customizing your fishing rod. Happy fishing!
Remember, practice makes perfect, so don’t be discouraged if your first attempts aren’t flawless. With time and experience, you will master the art of wrapping guides on a fishing rod. Now, go out there and enjoy your newly wrapped fishing rod!
Wrapping Guides On A Fishing Rod | Rod Building 101
Frequently Asked Questions
What materials do I need to wrap guides on a fishing rod?
To wrap guides on a fishing rod, you’ll typically need a few essential materials. These include thread, typically nylon or silk, guide feet adhesive, epoxy finish, thread tensioner, razor blade or scissors, rod wrapping stand or jigs, and a burnishing tool. These materials will help you secure the guides in place and provide a smooth finish.
How do I prepare the fishing rod before wrapping the guides?
Before wrapping the guides, it’s important to prepare the fishing rod properly. Start by cleaning the rod thoroughly with rubbing alcohol or a mild detergent to remove any dirt or oils. Then, make sure the guide feet are clean and free of debris. Finally, lightly sand the guide feet with fine-grit sandpaper to create a rough surface for better adhesion.
What is the proper technique for wrapping guides on a fishing rod?
The proper technique for wrapping guides on a fishing rod involves several steps. First, start with a few anchor wraps around each guide foot to secure it in place. Then, proceed with the spiral wrapping technique, making sure the wraps are snug but not too tight. Repeat this process for each guide, maintaining consistent spacing between them. Finally, finish with a few more anchor wraps and secure the thread with a knot or guide feet adhesive.
How do I ensure an even thread tension while wrapping the guides?
To ensure an even thread tension while wrapping the guides, you can use a thread tensioner. This tool allows you to control the tightness of the thread as you wrap, ensuring a consistent and professional look. Adjust the tensioner according to your preference, keeping the thread taut but not overly tight. Practice and experience will also help you develop a feel for maintaining proper tension throughout the process.
What is the purpose of using epoxy finish on the wrapped guides?
Using an epoxy finish on the wrapped guides serves multiple purposes. It provides a protective layer that helps prevent the thread from unraveling and ensures the guides remain secure. Additionally, the epoxy finish gives the rod a smooth and professional appearance. It also enhances the durability and longevity of the wraps, making them more resistant to wear and tear.
How long does it take for the epoxy finish to dry completely?
The drying time for epoxy finish varies depending on the brand and specific product used. Typically, it takes anywhere from several hours to a full day for the epoxy to dry completely. It is important to follow the manufacturer’s instructions for the specific epoxy product you are using, as drying times may differ. Avoid touching or moving the rod until the epoxy is fully cured to prevent any damage to the finish.
Final Thoughts
In conclusion, mastering how to wrap guides on a fishing rod is crucial for any angler looking to enhance their fishing experience. By following the step-by-step process outlined in this article, you can ensure that the guides on your fishing rod are wrapped securely and in a way that improves the rod’s performance. Taking the time to properly wrap the guides will result in smoother casting and increased sensitivity, ultimately leading to more successful fishing outings. So, whether you are a beginner or a seasoned angler, don’t underestimate the importance of knowing how to wrap guides on a fishing rod.